BUILD YOUR OWN COMPONENT
- What is a component?
- Component Files And Structure
WHAT IS A COMPONENT?
A component is a specific functionality of an application. Sometimes it has its own domain. Example of a component is a USER COMPONENT, E-COMMERCE COMPONENT or anything your application may need. In Laravel Backend, a component is used to separate domains or specific functionality for easy code maintenance and having clear separations of concerns.
When building a custom component, it will have its own directory, and will have its own MVVM|MVC.
So let's begin building our first custom component:
-
1.) First thing to do is using our CLI tool:
php artisan backend:component-create
After that command, it will ask you three question that look like this:
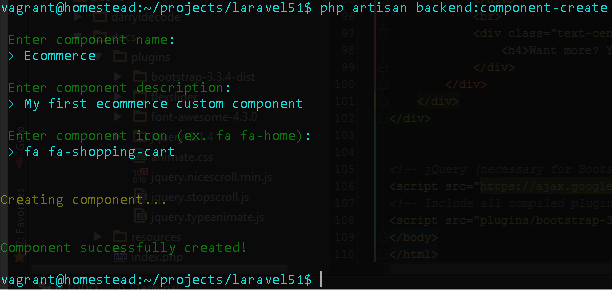
- COMPONENT NAME: The name of your custom component.
- COMPONENT DESCRIPTION: The description of your custom component.
- COMPONENT ICON: The icon of your custom component which will be visible on navigation. Only Font Awesome Icons are available.
-
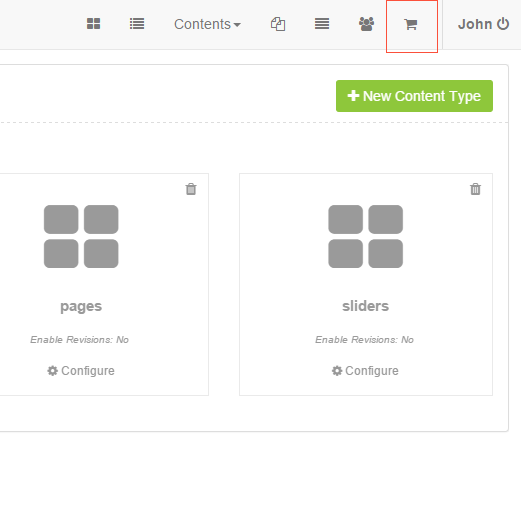
2.) After you have completed above instructions, if you are logged in as superuser, you will have now a new navigation entry on your backend which will look like this:
-
2.) On your
app/Backend/Components
You will also see the folder and files of your new custom component.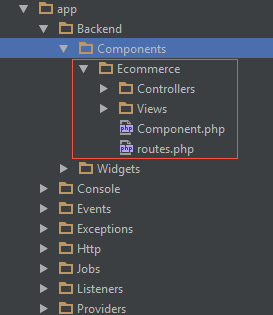
You will notice the folder app/Backend/Components/Ecommerce. That is our new custom component. You will see this component has its own routes file and its own MVC Architecture. What is interesting here is we have a file also which is named Component.php. That is the core file of your component which contains the information and other relevant data of your custom component.
The COMPONENT FILES AND STRUCTURE
The Component File (Component.php)
This file is the main foundation of a component. It contains several methods that represents the component.
Let's take a look first the first method on this Component Class:
1st: getComponentInfo()
/**
* returns the component info
*
* @return array
*/
public function getComponentInfo()
{
    return array(
        'name' => 'Artists Manager Component',
        'description' => 'A component to manage artists',
    );
}
As you can see, this method returns an array containing the Component Information.
2nd: getAvailablePermissions()
/**
* returns the available permissions of the component
*
* @return array
*/
public function getAvailablePermissions()
{

    // below are sample permissions, you can change them to fit your needs

    $availablePermissions = array(

        array(
            'title' => 'Manage Artists Manager\'s Component',
            'description' => 'Enable\'s the user to manage Artists Manager.',
            'permission' => 'ArtistsManager.manage',
        ),

        array(
            'title' => 'Delete Artists Manager\'s Component entry',
            'description' => 'Enable\'s the user to delete Artists Manager data.',
            'permission' => 'ArtistsManager.delete',
        ),

    );

    return $availablePermissions;
}
This method returns all the available permissions that the component provides. You can define permissions here to fit your components functionality and access control. The permissions defined here will be visible when managing user permissions on admin dashboard.
3rd: getNavigation()
/**
* the component navigation
*
* @return ComponentNavigationCollection
*/
public function getNavigation()
{
    // the new navigation for this component
    $myComponentNavigation = new ComponentNavigation(
        'Artists Manager', // the component navigation title
        'fa fa-paint-brush', // the component icon (font awesome icons)
        url(config('backend.backend.base_url').'/artists-manager') // the component url
    );

    // the required permission to access this component
    // if the user has no permission defined here, this navigation item will not be visible
    $myComponentNavigation->setRequiredPermissions([
        'ArtistsManager.manage'
    ]);

    // if you want to add sub menus
    $myComponentNavigation->addSubMenu(
        new ComponentNavigation(
            'Artists Manager Sub Menu', // the component navigation title
            'fa fa-paint-brush', // the component icon (font awesome icons)
            url(config('backend.backend.base_url').'/artists-manager/another-url')
        );
    );

    // push the component's nav to the nav collections
    $navCollection = new ComponentNavigationCollection();
    $navCollection->push($myComponentNavigation);

    return $navCollection;
}
This method is where you define your navigation that will be added on admin dashboard navigation. This should
return an instance of ComponentNavigationCollection (as you can see).
4th: getViewsPath()
/**
* returns the views path
*
* @return array
*/
public function getViewsPath()
{
    return array(
        'dir' => __DIR__.'/Views',
        'namespace' => 'ArtistsManager', // the namespace of your component view ( ex. view('ArtistsManager::index') )
    );
}
Nonetheless, you will never have to modify this, unless you know what you are doing.
5th: getRoutesControl()
/**
* returns the views path
*
* @return array
*/
public function getViewsPath()
{
    return array(
        'dir' => __DIR__.'/Views',
        'namespace' => 'ArtistsManager', // the namespace of your component view ( ex. view('ArtistsManager::index') )
    );
}
Nonetheless, you will never have to modify this, unless you know what you are doing.
6th: getHeaderScripts()
/**
* you can add scripts or css links here on header
*
* @return array
*/
public function getHeaderScripts()
{
    /*
    NOTE:

    css and js are important keys to identify whether a link is a javascript or css
    notice that forward slash in the beginning is present. Don't miss that!

    example:

    array(
        'css' => array(
            '/my-component/css/component-style.css',
            '/my-component/css/component-style2.css',
        ),
        'js' => array(
            '/my-component/js/component-js.js',
            '/my-component/js/component-js.js',
        )
    );

    */

    return array();
}
This method is where you add your scripts and stylesheets for this component (on the header). This will be relative to public path.
7th: getFooterScripts()
/**
* you can add scripts or css links here on footer
*
* @return array
*/
public function getFooterScripts()
{
    /*
    NOTE:

    css and js are important keys to identify whether a link is a javascript or css
    notice that forward slash in the beginning is present. Don't miss that!

    example:

    array(
        'js' => array(
            '/my-component/js/component-js.js',
            '/my-component/js/component-js.js',
        )
    );

    */

    return array(
        'js' => array(
            '/backend/components/artists-manager/index.js',
        )
    );
}
This method is where you add your scripts and stylesheets for this component (on the footer). This will be relative to public path.
The Component's Route File (routes.php)
This file contains all the routes for your component.
This file will look like below:
Route::get('/artists-manager', array(
    'before' => array(),
    'as' => 'ArtistsManager',
    'uses' => 'ArtistsManagerController@index'
));
All the routes here will be relative to backend base route.